|
4
| THE BODY TAG
The Body
The body
is where the magic all takes place. (Feel free to apply this sentence
to any "body" you wish.) The Body of a 3DML file is where you finally
get to make the map itself. There are five main activities that are handled
in the Body. (Again, feel free to apply this sentence to any "body" you
wish, and go ahead and spend a few minutes ruminating on exactly what
those five most essential activities are.)
Feel better? Good.
Now get back to work. The five activities that are handled within the
<BODY> tag are: customizing blocks, creating the map, creating POPUPs,
assigning image maps, and assigning entrances and exits. First we will
create a simple map and an entrance. We'll talk about all those other
aspects shortly.
The Map
The map is made up of individual levels that act just like stories of
a building. Each level in a spot must have the same number of rows and
columns. If you need to add extra rows or columns to a SPOT you have already
been working on, you will need to add those rows or columns to every
level in the SPOT.
Each level in a SPOT
is bounded by the <LEVEL>...</LEVEL> tags. The <Level> tag has
just one attribute: NUMBER. NUMBER="1" refers to the bottom level of a
spot, just like floors of a building. Any character between the <LEVEL>
tags will be interpreted as a block. All blocks occupy the space of a
cube with 256 pixels in every dimension [256x256x256].
New Blocks
For this first map we will use just two kinds of blocks.
The FULL Block
"#"
The FULL Block is a solid cube, filling up the entire 256x256x256 block
space.
The EMPTY Block
"."
Nothing but virtual thin air. The EMPTY block is just a place holder that
keeps your maps looking like easy-to-read grids.
Make
a map already!
Put the following code between the <BODY> tags in your 3DML file:
<LEVEL NUMBER="1">
###...###
#.......#
#.......#
#.......#
#.......#
#.......#
#.......#
#.......#
#########
</LEVEL>
The <ENTRANCE>
tag
You must always specify at least one entrance for your spot. The entrance
doesn't look like anything, it is just the place in the spot where your
visitors will first land. The <ENTRANCE> tag has three attributes:
LOCATION, NAME, and ANGLE. An <ENTRANCE> tag can be placed anywhere
within the <BODY> tag. Some builders prefer to put their <ENTRANCE>
tags immediately following the level in which they occur. Other builders
prefer to keep all of their <ENTRANCE> tags together just before the
closing </BODY> tag, after all of the levels have been defined. In
this tutorial, we will ask you to keep them together at the end of the
<BODY>. Just humor us. Our first spot will only have one level and
one entrance.
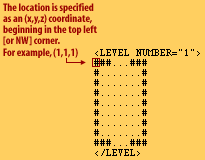
 The LOCATION is specified as an (x,y,z) coordinate, measured in blocks
[with 1,1,1 being in the top left (or northwest) corner of the bottom
level.]
The NAME attribute
allows you to name each entrance, so that you can refer to them later.
They act sort of like TARGETS in HTML. Every spot must have one entrance
named "default".
The ANGLE attribute
defines what direction your visitors will be facing when they enter the
spot. The ANGLE parameter has 2 values, specified in whole number degrees.
The first value specifies what direction (north, south, east, west, or
somewhere in between) your visitors will face. Possible values range from
0 to 359. The second value specifies whether they will be looking up or
down, with possible values of -90 to 90. The default value is "0,0" which
will leave your visitors facing north, and parallel to the horizon. A
value of "90,0" will set your visitors facing directly east, "180,45"
will leave them facing south, and 45 degrees up into the "air", etc.
Define
an entrance
Put the following code after the </LEVEL> tag in your .3DML file:
<ENTRANCE
LOCATION="(5,8,1)" NAME="default" ANGLE="0,0" />
 Congratulations!
You now have
a fully functioning spot! Save
the file as "firstspot.3dml" in
the Flatland Tutorial folder, and open it in your browser (simply drag
the file firstspot.3dml onto your browser window). You will find yourself
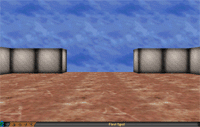
in a room with 4 walls and no ceiling. You should see your sky texture
overhead, and the ground texture underfoot. You will also see the SKY
texture in the open space in the wall in front of you. Go to the edge
and look over.
|


